2016年12月16日星期五

How to Transfer Notes from iPad to Computer?

If you are an Apple fan, you would have an ipad, and that would be the most needed product for any Apple fan after iPhone. What would you do with an iPad? Take photos, record videos, watch movies or listen to music. Besides all these fuctions, you can use it to save a lot of important files. You would save business plans, working schedules or other lists in your ipad, there is no doubt, iPad is a good note taking device in your daily life and work. But, you can't take an ipad to your meeting or in the work, you need to transfer them to your working computer. How to do this?
Apple wouldn't allow users to transfer data directly from ipad or any other iOS devices. So I think you need an iOS data transfer tool. This MobiKin Assistant for iOS would be helpful.

How to Transfer Notes from iPad to Computer.
Step 1.Connect your iPad to computer and launch the program, then make your iPad be recognized by the iPad Notes Transfer program.
Transfer or Copy Notes from iPad to Computer
Step 2. Tick the one or more iPad notes you wish to backup, then hit "Export" button to export and save them on your personal computer.
iphone-note.jpg

2016年11月25日星期五

How to Transfer Voice Memos from iPhone to Computer?

Many people choose iphone as their daily communication helper, they use it to send text messages, make phone calls, and surf the internet. Nowadays, iphone has been used to busisness occasions more and more, people use iphone to save important files, keep business notes, and of course make voice memos when in emergent situations. iPhone has the capacity to record voice memos, voice Memos is very helpful because it lets you make a quick recording of a voice note, memo, record a previous conversation, or just generally replace one of those mini-tape recorders that many people use for recording notes while they’re working or driving.
But with more and more voice memos have been stored in your iPhone, you found that they took up too much storage space, can we move them to pc? Here is a tool, MobiKin Assistant for iOS to help.

How to Transfer Voice Memos from iPhone to Computer


Step 1: Download and install the program on your computer , launch the program. Wait a few seconds of device detection.

Step 2: Click "Voice Memos" category displayed on the left column to get a preview of all voice memos on your iPhone. If you wish to copy them selectively, choose the files needed and hit "Export" to export them from iPhone to your computer.

2016年11月18日星期五

How to Transfer Music from iPod to Mac?

Many people enjoy music during leisure time, that always gives us great pleasure. When we are walking, when we are reading books or on the underground train. Music always plays an important role in our daily life, many people use iPod to listen to music. Ipod always offers great quality to music lovers, they enjoy the music played via iPod.
The reason many people like using iPod can be that it is small and easy to carry, also it provides great sound quality. And, iPod has simple operation interface. But, with the popularity of iPos, a problem has come out, more and more iPod users have met the problem of storage limitation with the growing songs. How can we transfer or backup these favorite music to a safe place? I would like to recommend MobiKin Assistant for iOS.


  How to Transfer Music from iPod to Mac?

Firstly, download and install the program on your Mac computer completely.

Secondly, connect your iPod touch, iPod nano, iPod shuffle or iPod classic to your Mac, then launch the program. Wait a few seconds of device detection, the detailed information of your iPod, including the type of device, the version of system and the capacity, will be shown in the main interface just like below.


Thirdly, click "Music" option in the left panel and all music list will be displayed in the right panel. So you can get a preview of the songs' list and choose the target songs. After that, click "Export" button to complete the process.

2016年11月6日星期日

How to Transfer Music from iPad to Computer?

For most idevice users, iPad is a product owned by most of them. And, when we use iPad to enjoy many funny thins, we usually take photos, listen to music with it. So, we often save a lot of photos and videos in the ipad, of course, besides ipod, we can use ipad to listen to music and watch videos.
When compared with iphone, ipad has a bigger screen, so it can give us a more interesting view of the video we are watching. In order to keep the data in the ipad, we often want to backup them to pc, because they are memories sometimes. But, how do you save photos, videos and even music files from your ipad to pc? Many of us may use iTunes to backup data, but here is a better way, you can selectively backup them with MobiKin Assistant for iOS.


How to Transfer Music from iPad to Computer
Step 1: Install and run the program on the computer, and make sure your iPad device is connected to the computer and iTunes has been also installed on your PC.


Step 2: Here you have two ways to copy songs from iPad device to a computer.
- Go to the "Music" option from the left file list of your iPad and all your stored songs will be shown in the right panel. Just click the small box before the music you want to copy.
- Click the image button of hook on the top menu to select the whole music folder at one time, then click "Export" button to save them on your computer.

Step3: Click the button of "Export" to back up selected songs to your computer.

2016年10月27日星期四

How to Transfer Pictures from iPhone to Computer?

For most iphone users, they often use iphones to take photos instead of professional digital cameras, the reason is that they are more convenient, and its high-pixel built-in camera and the feature of portability. However, the limitation of iPhone's storage always doesn't allow you to store a lot of files on the phone. The phone's internal memory will be occupied by more and more photos, videos, apps and other data. So if you would like to keep the photos for a long time, you should move them out of your phone and save them to a safe place, some people may choose to sync the data to their google account, and some may want to backup them to the hard disk. And of course, some iphone users transfer the photos directly to their pc.
It is no doubt iTunes is a good tool to manage your iPhone contents on the desktop computer, you can freely manage your iphone with it, but, to be honest,  it is not a good data transfer tool. So, you cannot use it to move the photos out of your iphone with iTunes, thus, you need to find a professional data transfer and backup tool, here comes a nice choice, MobiKin Assistant for iOS . And, it has versions for windows computer and Mac computer.

Steps on How to Transfer Pictures from iPhone to Computer?
Step 1: Install and run the program on the computer, and make sure your iPhone  is connected to the pc and iTunes has been also installed on your pc. After device detection, you will see an interface about your device, and files divided into different folders on the left panel just like the below:

Step 2: Choose "Photos" in the left panel, then you can preview all pictures stored on your iPhone and mark the ones that you want to export.

Step 3: Click on "Export" button to transfer and save the selected photos on your computer directly.

2016年9月8日星期四

How to manage iPhone7/7 Plus when you buy one?

Say hello to the iPhone 7 – Apple's latest flagship smartphone, with upgraded cameras, water resistance, stereo speakers and a longer battery life, and the iPhone 7 and 7 Plus will ship with the new iOS 10, now we are excited to learn more about the actual phones.


Like the rumors tipped, the iPhone 7 is indeed more durable than its predecessors. It is Water and Dust resistant, thanks to IP67 protection. And, there are two new black colors: 'Jet Black' and 'Black', what’s more, the Camera bump remains.
Here’s everything you need to know about the new iPhones, and trust us, there’s a lot of interesting changes.
iPhone 7 cost
32GB - $649 (£599, AU$1,079)
128GB - $749 (£699, AU$1,229)
256GB - $849 (£799, AU$1,379)
iPhone 7 design
Dust and water resistance
Two new black colors: 'Jet Black' and 'Black'
Camera bump remains
iPhone 7 headphone jack
No headphone jack
Lightning EarPods in the box
Adaptor for standard headphones in the box
Wireless AirPods available at extra cost
iPhone 7 camera
A larger, single-lens 12MP rear sensor
Raw support, 50% more light, 60% faster, 30% more power efficient
Front camera now at 7MP
iPhone 7 battery
Longest-lasting iPhone ever
rs more life than iPhone 6S
iPhone 7 display
4.7-inch, 1334x750 resolution
Brighter
iPhone 7 OS and power
Four-core, 64-bit A10 Fusion processor
iOS 10
iPhone 7 home button
A pressure-sensitive home button
Taptic feedback


Now, let’s show you some useful tips when you use iPhone.

How to Backup&Transfer Contacts from iPhone to Computer

There will various types of files in your iPhone 7 and transfering them from the device to computer has been a problem that trouble many iPhone users. Here we will teach you a simple but effective method to perform the file transfer between iPhone and computer. The software is MobiKin Assistant for iOS, which can not only support the iPhone7 but also can be compatible with other types of iPhone, iPad and iPod. As we know the iTunes is difficult to operate and this software can be the best alternative to iTunes. Want to have a try? Just download the free trial version of the software, and then you can transfer videos, voice mail, contacts, playlists and so on from device to computer.
Here is the easy and detailed guide:
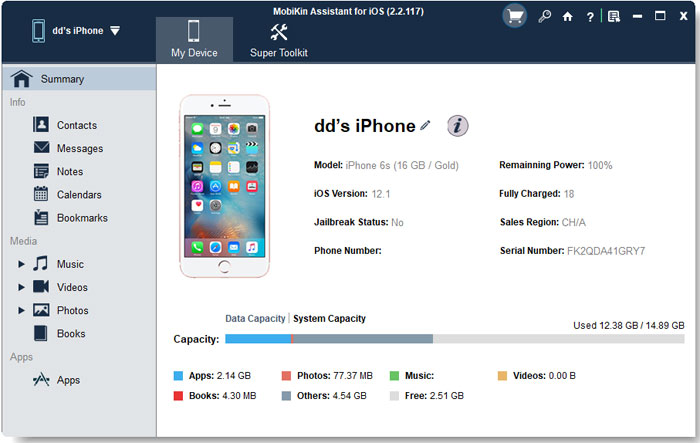
Step 1. Be sure your iPhone device is connected to the program, then launch the program. It will detect the connected iPhone automatically and show you an interface like below:
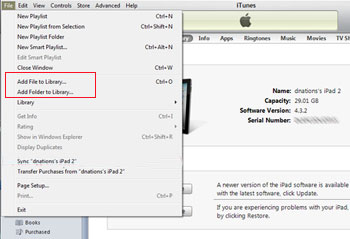
Note: iTunes is required to be installed on your desktop computer at first.
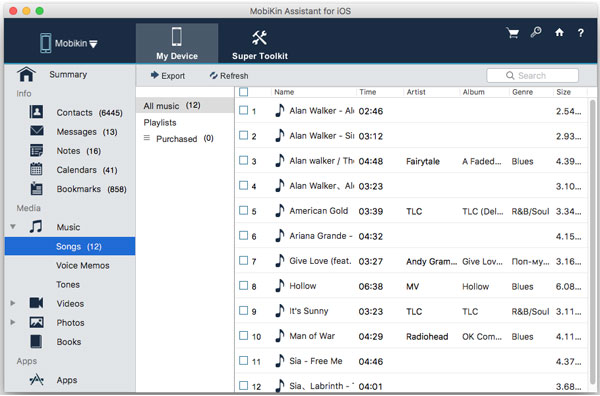
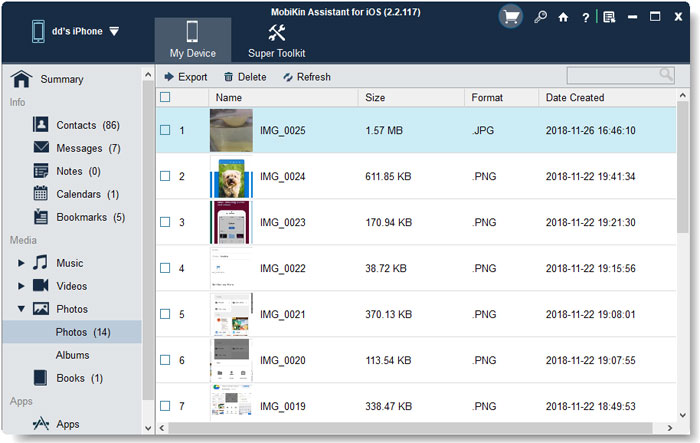
Step 2. In the left panel, you can find the file types under the name of your device. Directly click them to preview the detailed files under these option. Then, you're allowed to mark your target files and click "Export" button to save them on your computer easily.


How to Recover Formatted Data from iPhone on Windows/Mac?

You are able to restore the deleted files as long as you use the professional tool. But before the recovery process, you need to assure that there is not any new files being added into your device. Actually, you'd better stop playing your mobile phone anymore after your files were deleted or formatted. Because if you keep playing your device, the new files may be generated and then overwrite the deleted files.
Then you need the recovery software - MobiKin Doctor for iOS. The software is easy to operate and the interface is simple and concise so that you can just follow the instructions on the window.
Step 1: Connect Your iPhone to PC and Start Scanning for Files
Connect your iPhone to the computer via USB cable, and then you can run the program. Make sure your iPhone is jailbroke. Then the iPhone could be detected by the software and then hit the Start Scan button on the below right corner.
Step 2. Recover Formatted Files
Click on the option according to the files you want to recover and then preview detailed files on the right panel. Mark the files you want to recover and hit the Recover button to recover the marked files to computer. By the way, the deleted files will be marked in red color.

Besides these, you can also get more guides,

How to Transfer Contacts from Android to iPhone

How to Erase Everything on iPhone before Selling

To know more information, click here:

Will You Buy An iPhone 7 or iPhone 7 Plus?

2016年8月26日星期五

How to Transfer Music from iPhone to Computer?

Music on your iPhone always can take lots of pleasures or memories when you’re alone. So people like to download or purchase their favorite songs from iTunes store to the portable iPhone devices directly. After a period of time, you may found that too many songs have stored on your iPhone and your device may out of space. Therefore, you need to find another space to store your favorite songs and undoubtedly desktop computer is an ideal destination here. Or sometimes your computer may crashed and all files on your iTunes library may be erased, so you have to backup your iPhone music to iTunes library for better enjoyment, right? No matter what situation you’re, today we could like to show you a free way to move music from iPhone 6 Plus, iPhone 6/5S/5/4S, etc. to desktop computer or iTunes library easily.

Situation 1. How to Transfer Music from iPhone to Computer?

We know that iTunes is a one-way tool for users to manage data on iDevices. And it have no right to export data from iDevice to computer or other places due to its copyright and authority protection. However, MobiKin Assistant for iOS Free and Free Assistant for iOS (Mac Version) can do you a favor here.

Free Program to Backup iPhone Music to PC or Mac Computer

MobiKin Assistant for iOS is a professional yet reliable freeware on the market, which empowers users to copy up to 14 types of files from iPad, iPhone and iPod devices to desktop computer within few clicks. And MobiKin guarantee here no quality losing during the process.

– One-click to backup iPhone music folder to PC or Mac as you like;
– In addtion to iPhone Music Transfer freeware, this program also works well as the best free iPhone Contacts Transfer, free iPhone Message Transfer, free iPhone Photo Transfer and so on.
– Preview files before exporting as you like.

Step 1 Link Your Device to PC/Mac and Run the Program
When you have installed the program on the Windows or Mac computer, you can directly launch the iPhone Music Transfer program. After that, connect your iPhone 6 Plus, iPhone 6 or iPhone 5S/5/4S/4 to your personal PC via its USB cable. Then you can click “Refresh” button to detect your device immediately. (Mac users please follow the same steps on your Mac computer)

 
Note: iTunes is required to be installed on your Windows or Mac computer, but it is no need for you to run it manually.
Step 2 Preview Files and Begin to Export
You’re enabled to preview detailed files before transferring. So once your iPhone data is scanned by the program, you can click the button like “Music” to view the whole song list on iPhone.
 
Find and mark one target file on the program and then you can click “Export” button to save them on your Windows or Mac computer for free.

2016年8月12日星期五

How to Sync Notes from iPhone to Mac?

As an iphone user, you may used to take notes on your iPhone for keeping track of customers, contacts, meetings, job proposals, etc. that saved on the device, so that you can manage your daily business more organized and effective. And for some very crucial plans or job proposals, you may need to transfer these notes from iPhone to Mac for backup, right? We know that you can reach the goal by sending the notes with emails, but obviously, it is a waste of time. So lots of iPhone users are looking for an effective yet simple way to copy iPhone notes to Mac. If you also have the same need, then congratulations, you’ve been the right place!
When the idea of syncing notes from iPhone to Mac comes to your mind at the first time, maybe you have tried to achieve it with iTunes, right? Undoubtedly, iTunes is an ideal tool to manage iPhone media files on your desktop computer, but more and more facts have proved that iTunes is not a good transfer tool for your iDevice. Since to the Apple’s copyright and authorization protection, you can’t export files from your iDevice to Mac or PC with iTunes or USB cable directly. But that doesn’t mean there is no opportunity to backup iPhone notes on your personal computer. The key point here for you is to find a reliable yet professional notes transfer program for iPhone 6/5S/5/4S/4.
MobiKin iPhone to Mac Transfer is an all-in-one iPhone transfer program on the Internet, that can help users transfer, copy or move notes from all generations of iPhone, iPad or iPod to Mac or PC within few clicks. And it also enables users to transfer iPhone files like music, movies, safari bookmarks, contacts, photos, etc. to Mac computer without hassle. Now, just click the below icon and follow the instructions to see how easy the iPhone Notes Transfer for Mac works.
Tips: iTunes is required to be installed here to manage files on your iDevices.


How to Sync Notes from iPhone to Mac/PC Easily?

Step 1 Make Your Device be Detected by the Program
To get started, you need to link your iPhone 6 Plus, iPhone 6/5S/5/4S/4 to Mac computer with USB cable, then ensure iTunes can detect or authorize your device. Then run the best iPhone Notes Transfer program for Mac and it will detect your device and show it in the program as the image shows.

Step 2 Export or Movie Selected iPhone Notes to Mac
In the left panel, you can find the option of “Notes”, and then you’ll get an entire list of notes on your iPhone. Tick the file you wish to backup and hit “Export” button to save them on your personal computer well.

Note: Mac version of MobiKin iPhone Notes Transfer have not added the type of notes into its supported data, but the Windows version have included. So please reach your goal on a Windows computer or wait for a few days, the function of syncing notes from iPhone to Mac will be added immediately.

2016年7月14日星期四

How to Transfer Notes From IPhone to IPhone ?

The note function have helped users record lots of important meetings, tasks or something important on their mobile phone, so when you upgrade your old iPhone to a new one, you may wish to move these notes to the new device for further using, right? However, more and more iPhone users find that it is hard to move notes between two different iPhone devices with a simple USB cable or iTunes. We know that due to the Apple’s security limitation, iTunes only can be used to import files from computer to iPhone, but not export data from your iPhone to PC. Thus, in order to sync notes from old iPhone to new one, you’d better to export the iPhone notes to computer at first, then sync them to your new iPhone with iTunes easily.
As we mentioned above, iTunes doesn’t allows users to transfer data from iPhone to computer, so here you need to find a tool to help you to copy iPhone notes to personal PC. If you have no idea about it, you can take a free trial on the recommended MobiKin Assistant for iOS. It is a 100% safe yet risk-free tool, that allows users to export not only notes, but also contacts, safari bookmarks, music, photos, movies, etc. from iPhone, iPad or iPod to computer within 1 simple click. With the program, transferring notes between iPhone could be more easier for you. Now, just get the free trial version of the powerful iPhone Note Transfer program and follow the below steps to start your own transferring journey.
With it, you can ,
Easily Copy Tons of Files from iDevice to PC
Different Ways to Preview Files Arbitrarily
Quick Filter and Search
Run Smoothly with Multiple iOS Devices

How to Transfer Notes from iPhone to iPhone ?
Step 1. Run the Program and Link Your Old iPhone to PC
Directly launch the program after the installation, then using the USB cable to connect your old iPhone 5S/5/4S/4 to the computer, and after the detection, you’ll see an interface like the right side.

Step 2. Transfer iPhone Notes to Computer
Select “Notes” in the left panel, and check the detailed notes in the program. Here, you can tick the data you wish to export one by one, and then hit “Export” button to save them on your computer.

Step 3. Sync Notes from Computer to New iPhone
Eject the old iPhone and connect the new one into the computer. iTunes will be launched automatically, here you can click “Add File to Library…” to sync the notes to iTunes library. After that, you can find the linked iPhone under the tab of “DEVICE”, then, click the “Info” tab and scroll down to the “Other” option. Now, you can check the option of “Sync Notes” option to import the synced notes from iTunes to iPhone easily.

2016年7月7日星期四

How to Transfer video from iPad to Computer ?

For iPad users, they often take a lot of photos or videos with their iPads, and videos take a lot of space, when there is not enough space for your iPad, how do you solve this problem ? I think, for people who don’t wish to delete any video file from their device, transferring these precious iPad movies to desktop computer could be a nice choice.
As it is known to all that we can copy videos from computer to iPad directly with the help of iTunes. But actually, iTunes can also be used to help users transfer videos from iPad to PC easily and you can view the videos on your computer in iTunes directly. However, the exported iPad movies can only be found and played in your desktop iTunes. Thus, if you’re going to view, upload or share the videos in other places, you may fail to achieve the goal. Therefore, more and more iPad users are looking for a way to watch and make their iPad videos available on the computer without iTunes, so that they can sync, share or view the videos in any other devices without limitation. Since the restrictions provided by Apple, iPad users can’t directly transfer movies or videos from the iPad to PC or Mac via a simple USB cable, but it is doesn’t mean it is impossible to do it. Therefore, an all-in-one yet powerful 3rd-party program is a good choice.
But, how do you transfer your videos out from your iPad or iphone? If you have thousands of pictures, can you move them out for one time? Here, I’d recommend a tool for you, MobiKin Assistant for iOS.

With it, you can backup all contents on your device to computer with one simple click.
1.Easily Copy Tons of Files from iDevice to PC
2. Different Ways to Preview Files Arbitrarily
3. Quick Filter and Search
4. Run Smoothly with Multiple iOS Devices

Steps on How Transfer video from iPad to Computer.
1.Launch the Program and Make Your Device Detected
Ensure the iOS device is connected to computer, then run the program on your computer after the installation. The tool will auto-detect the device which is linked to the PC, and display the basic information of your device in the main interface.

2. Preview & Find Your Target Files Quickly
Click “Movies” in the left panel to have a brief look on the whole movie list in the program. Click the image button of hook on the top menu to select the whole files at one time or you can mark specific files and click the “Export” button to finish the whole process.

2016年6月3日星期五

How to Print Contacts from iPhone ?

Many People may meet such situations that require you to make a backup of the contacts from your iPhone to computer. For example, you may lose the contacts due to the wrong operation or accidents. Sometimes all the files may be lost if you failed to update your device. Then you may need to recover the deleted data from your iPhone. Here we will tell you how to print the contacts as a backup.
If you have a wonderful mobile phone assistant – iPhone Contacts Manager (Windows/Mac), you can easily manage the contacts on computer. The other functions of the software are as follows:
– The software can support various types of iOS devices like iPhone, iPad and iPod with high compatibility.
– The users are able to manage many files in the iPhone like contacts, voice memos,messages, photos, books, videos, music, note, safari and so on easily and quickly. What’s more, you can export these files to the computer as a backup with no hassle.
– The software is easy to operate and you can finish the managing operation quickly. The software will detect the connected device automatically and deeply and then all the files will be displayed on the interface as different categories. So you can find the target files quickly.
– The software is 100% risk-free and clean without any spyware, malware and viruses.

How to Print Contacts from iPhone

Step 1. Download and install the software on your computer. Then link your iPhone to computer with its USB cable. Run the software and the software will detect the connected device automatically. You may need to open the USB debugging. Follow the steps below to enable the USB debugging. (If you did this before, you can skip to the next step directly.)
– For Android 2.3 or earlier: Enter “Settings” < Click “Applications” < Click “Development” < Check “USB debugging”.
– For Android 3.0 to 4.1: Enter “Settings” < Click “Developer options” < Check “USB debugging”.
– For Android 4.2 or newer: Enter “Settings” < Click “About Phone” < Tap “Build number” for several times until getting a note “You are under developer mode” < Back to “Settings” < Click “Developer options” < Check “USB debugging”.
Then you will see an interface like this with many categories on the left panel and the main parameters on the right panel.

Step 2. Click on the Contacts option to preview the contacts that are saved on the iPhone. You will also see the name, phone number, email and address on the right panel. Mark the wanted contacts and then hit the Export button to transfer them to computer.